
Manufactured stone has come a long way over the past sixty years, and it’s become difficult to differentiate between manufactured stone and the real thing. Most of us see beautiful buildings every day that are clad with a system that looks just like natural stone. Properly installed, and integrated with other systems in the wall or building, manufactured stone masonry veneer offers homeowners, designers and installers endless creative possibilities.
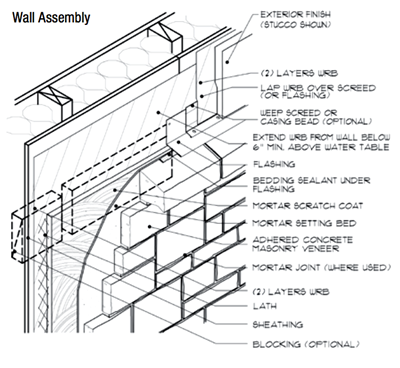
The Wall
 Due to its light weight and flexibility, almost any building, wall, fireplace or landscape feature can be enhanced with manufactured stone veneer. It can be installed over both wood and metal-framed walls. It can also be applied over masonry substrates of brick, CMU block or even poured concrete.
As you’re designing your project, it’s important to remember that your wall must be built in compliance with local building codes, and it needs to be structurally sound. In framed construction, 16” stud spacing on centre is the standard. Sheathing materials need to have proper gaps — typically 1/8” (3mm) at the seams — to allow for expansion. You will need to apply two layers of Water Resistant Barrier (WRB) over your framed wall. A foundation weep screed provides an exit point for water, and protects the framing materials from potential damage.
Water Management
For exterior walls, three systems come into play. A barrier system is required, stopping water at the outer face of the cladding. A concealed barrier system adds a second moisture management material further into wall, to drain away water. And a third hybrid of the concealed barrier system, the rainscreen, increases the air space between the water resistant barrier and the cladding. This approach allows the designer to provide efficient water drainage and ventilation drying.
The Lath
Lath is the skeleton for your veneer cladding. Lath transfers the weight of your adhered veneer system to the framing. There are several choices available: woven wire, welded wire, expanded metal, fibreglass and plastic. Since the combined weight of manufactured stone, mortar and lath can come to 25 lb./sq. ft., you will want to select a product with the manufacturer’s proof of compliance to the appropriate (ASTM) material specification.
Select fasteners of sufficient length to penetrate at least 3/4” (19.05mm) into the framing, and space them 6” (15.24cm) on centre. At both horizontal and vertical seams, lap the lath 1’ (30.48cm), with the vertical seams at framing members. With corners — both inside and outside — wrap your lath around the corner and to the next framing member.
The Scratch Coat
Your scratch coat should be 1/2” – 3/4” (12.7 – 19.05mm) thick. Using either self-furring lath, or lath furring fasteners, you want your lath to be centred near the middle of the mortar thickness. When the lath is encapsulated in a mortar scratch coat, it minimizes the amount of air and moisture that can reach the lath. Where metal lath has been used, this can significantly extend its corrosion resistance. Also, the combined mass of the scratch coat and setting bed mortar, along with the stone units, allows the wall to manage water through evaporation and absorption.
The Setting Bed
To achieve the 50psi building code requirement for shear bond strength, there are several procedures and considerations you should be aware of. To ensure maximum contact and adhesion, scrub any loose material from your stone units and confirm that the surfaces are clean. Select a high quality mortar that meets the requirements of your stone manufacturer. Weather is a factor. If it’s hot and dry, the back of each stone unit and the mortar will need to be dampened before setting. In cold weather conditions, your application will need to be tented and materials heated, both during installation and curing. Refer to the mortar manufacturer’s documentation. Use the inverted test to check that your mortar is wet enough to remain adhered to the trowel when it’s turned over. Only mix as much mortar as you can use up during the working time. Once the working time has expired, discard the remainder and make a fresh batch.
There are three options when it comes to application: 1) You could trowel mortar onto a 5 sq. ft. (0.46 sq. m) area of the wall, at a 1/2” – 3/4” (12.7 – 19.05mm) thickness; then press the stone units into the mortar with a slight back and forth rotation. 2) You could butter the back of the stone units with mortar. A thin layer is applied, pressing it completely into the texture of the stone. A second layer is then applied, bringing the thickness to 1/2” – 3/4” (12.7 – 19.05mm). The stone is then pressed onto the prepared scratch coat. 3) You could use a combination of the two methods.
It’s important that there are absolutely no voids in the mortar. Voids can capture water. If the trapped water were to freeze, the mortar could crack and cause the stones to de-bond. Efflorescence is also a potential risk, where salt migrates to the surface and forms a coating. Trapped water also has more time to find its way into the building.
Why Cultured Stone® is the Premier Brand of Manufactured Stone
Boral® has been the leading brand of manufactured stone for more than 50 years. The textures, colours and shapes of natural stone are meticulously recreated in lightweight aggregate. Each product is master crafted from the highest quality materials. Superior quality control measures are in place throughout the manufacturing process, and Boral’s products undergo stringent 3rd party testing, to continuously verify the quality, reliability and consistency. This qualifies Boral® to be one of the few manufactured stone veneer manufacturers with ICC-Evaluation Service Approval.
Cultured Stone® comes in exciting textures like Pro-Fit® Alpine Ledgestone, Pro-Fit® Ledgestone, Cast-Fit®, Coral Stone, Drystack Ledgestone, European Castle Stone, Rockface, River Rock, Stream Stone and Cultured Brick® Veneer, and an array of gorgeous natural colours.
Cultured Stone’s veneers are stunning in their authentic look and feel, but often it’s the grout lines that separate the stone units that really make them pop. Creating the perfect mortar joint for your project includes not only selecting the perfect colour, but also the right width. This choice also affects the total square footage. A standard mortar joint is 1/2” in width, but some of the textures allow for a dry stacked, tight-fitted joint. This can give your wall a cleaner, more tailored appearance.
It’s the details that can really make your home special. Boral® Cultured Stone® offers a selection of matching architectural stone trim pieces, like electrical boxes, keystones, trim stones, Tuscan lintels, watertables/sills, flagstone pier caps, capstones, wall caps and hearthstones.
Cultured Stone® wall products carry a 50-year limited warranty, when used on structures that conform to local building codes and when installed according to manufacturer’s instructions. For more details, please download the warranty document.
Cultured Stone® employs a closed-loop recycling system that allows them to reuse water during manufacturing. They also incorporate a minimum of 54% pre-consumer waste stream material into Cultured Stone®. Boral’s commitment to thinking and building green has also allowed them to meet the indoor air quality standards of the GREENGUARD Environmental Institute and GREENGUARD Gold. In addition, Cultured Stone® veneer is a NGBS Green Certified Product.